


Ok, so I'm not about to write a book on The Art of Arranging Frames anytime soon. I'm certainly no expert! But I do have a couple little frame hanging projects to share - including a NEW recent frame-related update! Woohoo :) First, though, I have to say...I love me some nice art arrangements on the wall. Just check out a few of them that I've pinned on good ol' Pinterest:


Awesome, right?! I had been wanting to do something similar (on a smaller scale) on the living room wall for a while to fill up some empty space, and I really wanted to do a fun, asymmetrical arrangement. So back in 2011 - After discovering Pinterest and taking a little inspiration from the world wide web - I got some photos printed and bought a mix of some white frames on one of our (unfortunately few and far between) IKEA trips. Trent and I both agreed we wanted only black and white photos - we just like the way they look I guess, but it's really a personal preference.
I didn't have a particular arrangement in mind, and I wish I had some good tips on arranging the frames in an "aesthetically pleasing" way, but I really don't! I guess you just need to use your eye for the most part to get them into an arrangement that looks good to you. So, literally the first thing I did was set all my frames on the floor in an arrangement that I liked:

This is very close to the end arrangement I used. By the way - the photo in the middle is an old picture of Trent's late grandparents. And the one on the bottom right is one of the first pictures we took together as a couple - on one of our first dates! The rest are just photos we took during trips and events together.
Once I had the arrangement I liked, I cut out some old newspaper ads into corresponding sizes with the frames, and took some measurements to determine how far apart from one another the frames were placed. I then transferred the newspaper ads onto the wall and taped them up using FrogTape Painter's tape. With this template taped to the wall, it was then pretty easy for Trent to hammer in nails to hang the frames in the right place.

Once the nails were in, all we had to do was take the ads off the walls and hang the frames!


With only 7 small frames, it's definitely not a full gallery wall or anything, but there is plenty of space to grow and change things around if we feel like it. In fact, a few weeks ago, I did switch things up a little bit, and it now looks like this:
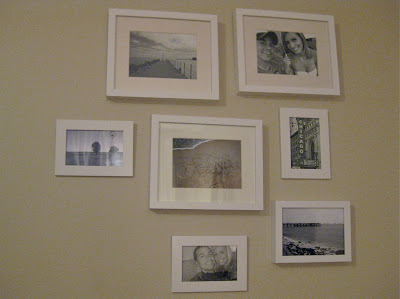

Don't mind the color of the wall looking different - It's the same wall color, just later in the day and with the lights on, so it looks darker! But I just got some more photos printed, so I replaced a few of them and switched a few things around. The one that's now in the middle is from our East Coast vacation last summer, taken in the Outer Banks. I loved that place.
Here's the same corner - If you scroll up a little, you'll see that we have switched out the bench for one of our side chairs. Not sure if this will be a temporary or permanent thing, but I kinda like it. I switched it when I brought in the Christmas tree..we shall see if it stays...

Oh, and the baseboards haven't been installed yet. We have to wait until we can raise the floor a little with jacks to make it more level, and do some foundation work. = Old House Problems! It's fun, I tell ya!
I also have a quick related update I want to share that's actually Brand Spankin' New! In fact, we just did this last night at about 8:30-9:00! I'd been wanting to do something with our blank bedroom wall for a long time. And I had lots of frames sitting around with no place to call home. So...Last night, we took our bland bedroom wall from this.....

To This:

I - LOVE - it! (there's a lot of "Love" on that wall if you haven't noticed...) It was pretty easy, too. I followed pretty much the same steps I did to hang the living room frames.
First I gathered all my frames and laid out the arrangement on the bed:


I then taped them to the wall with Painter's tape and a little measuring:

Then Trent just hammered in the nails using the marked spots on the paper, and we hung them!

All of the white frames are from IKEA, and the long one in the center was something we bought when I first moved in. I believe it lived in the hallway for a little while. The LOVE signs were ones we have had a while as well and previously hung in the hallway and the living room.

I'm soooo glad we finally hung all the frames! Now we don't have to stare at a blank wall anymore :)
No comments:
Post a Comment